A while ago I decided to give Vue3 a try and what better test drive than to build something. Since I did mostly Kubernetes and DevOps stuff on my Neovim, no specific configuration had been done in order to support VueJS development.
In my journey (that’s the appropriate term) to configure Neovim for this new project, I had to dig in order to make it work and to make the experience enjoyable (code completion, linting, etc.).
Base configuration
I found that one important thing to know in order to see if a tutorial applies to you is having a similar configuration than in the tutorial; so here’s mine:
- Neovim 0.11
- Ubuntu 24.10
My Neovim configuration is forked from TJ De Vries kickstarter which gives an amazing starting point. More on this in the references if you are interested.
Since I am using this starter kit, I already had the following plugins installed which will be important in the reminder of this configuration:
- nvim-lsp
- mason
- mason-lsp
- conform
Configure your Neovim
Open your main nvim configuration file
All configuration I will describe in this post will be done in the main nvim configuration file; that is init.lua, at least in my config.
So first things first: open your main configuration file using nvim. For me, the command I use is:
nvim ~/.config/nvim/init.luaNow we are ready to go …
Step 1: Install Mason language servers
In order for VueJS to be handled properly by Neovim, you need to have the LSP vue-language-server installed. In order to do this, open Mason with the following nvim command:
:MasonOnce you are in the Mason menu, scroll down to vue-language-server and type i for install. Upon installation it should appear on the top section of Mason under the Installed Category.
Important note: As of v2.0.0, vue-language-server doesn’t rely on type-script-language-server like it used to; now vue-language-server is able to provide support for Vue, javasript and typescript.
So, in order to avoid conflicts, I deleted the typescript-language-server LSP from Mason.
Step 2: Install and configure Neoconf plug-in
Neoconf is a plugin that allows to override nvim configurations on a per project basis. This allows to activate/deactivate language servers according to a project configuration. It is particularly useful if you are working with multiple setups that are conflicting.
Install the plug-in
To install the neoconf extension, first add the following lines to your init.lua:
{
  'folke/neoconf.nvim',
  cmd = 'Neoconf',
  opts = {},
},
Important note: according to the plug-in’s documentation, you need to have those lines before the nvim-lspconfig plug-in configuration.
You need also to declare Neoconf as dependency of the nvim-lspconfig section as per the Lazyvim documentation. All relevant links are listed in the references section.
In order to do that, copy/paste the same lines as above to the dependencies section of nvim-lspconfig.
{
  'neovim/nvim-lspconfig',
  ...
  dependencies = {
    ...
    {
      'folke/neoconf.nvim',
      cmd = 'Neoconf',
      opts = {},
    },
    ...
  },
  ...
},
Configure your project to use the plug-in
In order for your project to use the Neoconf, you can add a configuration file named .neoconf.json at the root of your project.
For the sake of simplicity, I will not provide too many details about the plug-in itself. Here, the only thing of interest is how to tell neovim to configure certain LSP extensions when editing projects having a neoconf configuration file.
In our case, we want to deactivate conflicting LSPs, like typescript_language_server for example.
An example configuration of Neoconf disabling typescript_language_server could look like this:
{
  "ts_ls": {
    "disable": true
  }
}
Important note: at the time of writing, the short name of typescript_language_server is ts_ls (formerly tsserver).
Now that we configured our project to indicate which language server has to be disabled, lets make sure our nvim configuration reads it.
Step 3: Configure Mason-lspconfig
First, we need to modify the mason-lspconfig in order to load the appropriate language servers.
Load only needed language servers
In order to do that, we will modify the handlers section of the mason-lspconfig setup section. Add (or modify) the following function:
require('mason-lspconfig').setup {
  ...
  handlers = {
    function(server_name)
      local server = servers[server_name] or {}
      if require('neoconf').get(server_name .. '.disable') then
        return
      end
      if server_name == 'volar' then
        server.filetypes = { 'vue', 'typescript', 'javascript' }
      end
      server.capabilities = vim.tbl_deep_extend('force', {}, capabilities, server.capabilities or {})
      require('lspconfig')[server_name].setup(server)
    end
  }
}
What this essentially does is to read the project’s neoconf file (if existing), looking for the disabled keyword using the Neoconf request API. If found, the language server is not loaded.
If the language server candidate is volar (short name of the vue-language-server extension), we modify the handled filetypes for which the language server has to be attached.
Configure the volar language server
Lastly, make sure your volar extension is configured as follows in the nvim-lspconfig server section:
local servers = {
  ...
  volar = {
    filetypes = { 'vue', 'javascript', 'typescript', 'javascriptreact', 'typescriptreact' },
    init_options = {
      vue = {
        hybridMode = false,
      },
      typescript = {
        tsdk = '<path_to>/lib/node_modules/typescript/lib',
      },
    },
  },
  ...
},
Step 4: Setting up formatting (optional)
In this optional fourth step, we will quickly set up Prettier as default formatter for our VueJS projects.
Install Prettier
For ease of use, the prettier package can be installed globally using the following command:
npm install prettier -gImportant note: I always make sure that prettier is also part of the development dependencies of my projects. This way I don’t have to reinstall it if my code runs on a different machine.
Add prettier as default configuration
The kickstarter nvim configuration I am using already ships with the conform.nvim extension which takes care of formatting. Adding prettier as default formatter for VueJS related files is as easy as adding the following lines to the formatters_by_ft key inside the plug-in configuration:
{
  'stevearc/conform.nvim',
  ...
  opts = {
    ...
    formatters_by_ft = {
      javascript = { 'prettierd', 'prettier', stop_after_first = true },
      typescript = { 'prettierd', 'prettier', stop_after_first = true },
      vue = { 'prettierd', 'prettier', stop_after_first = true },
    },
    ...
  },
...
}
Results
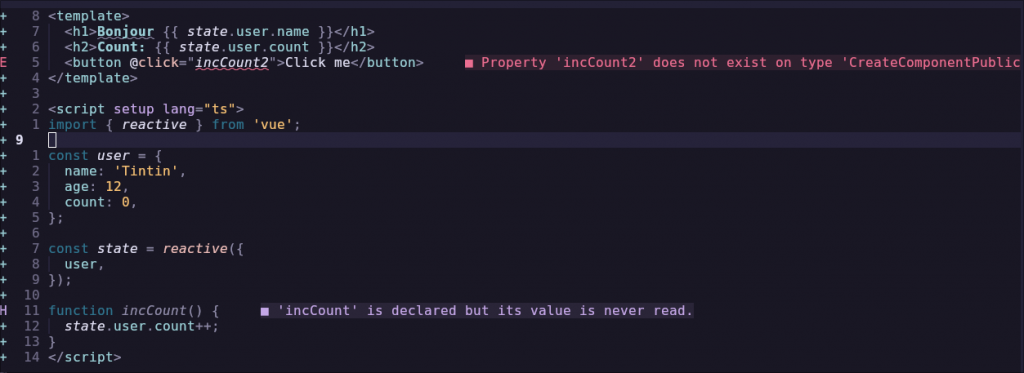
References
- TJ De Vries – kickstarter config for Neovim: https://www.youtube.com/watch?v=m8C0Cq9Uv9o&t=681s&pp=ygULdGogZGUgdnJpZXM%3D
- Neoconf plug-in: https://github.com/folke/neoconf.nvim
- Neoconf lsp integration: http://www.lazyvim.org/extras/lsp/neoconf
- Article on volar vs. ts_ls: https://theosteiner.de/using-volars-takeover-mode-in-neovims-native-lsp-client
- Using Volar with typescript-tools extension: https://github.com/pmizio/typescript-tools.nvim/issues/249#issuecomment-2282861705