You probably heard of an amazing piece of technology called Devcontainers. Largely pushed by Microsoft through their editor Visual Studio Code and their online development platform Codepsaces, it makes this piece of software the ideal companion to completely containerize your development environments.
Since I am a huge fan of containerization, I had a closer look.
In this article, I will briefly explain what Devcontainers are and what they are good for and show you how I created my devcontainer structure for my development workflow.
Devcontainers
What is a devcontainer?
In a nutshell, a devcontainer can be seen as a Docker-container-like item, running on a host machine and allowing the user to ssh into it.
The content of the devcontainer is fixed in a specific configuration file called .devcontainer.json.
This is where its gets interesting: this .devcontainer.json file details what tools and software gets installed in the container when it is build. Exactly like a Docker container, bur for development purposes (unlike Docker which is more runtime oriented).
Although Devcontainers are largely documented by Microsoft, it is also a specification allowing users to create full-featured development environments using containers.
As for any specification, there are multiple implementations amongst which:
- The one from Microsoft used in Visual studio code.
- The one from Jetbrains used in Intellij and other derived IDEs.
- The one from Loft LabsOne called DevPods (which we will be using since it is editor agnostic and open source).
- And of course many more.
What is a devcontainer good for?
Imagine you work on multiple projects with various configurations. You have to install all software on your machine and most certainly juggle with versions, isolation and perhaps even conflicts. Maybe you need to install some software to test it out … see where I am going with this?
What if there is a way to have separate development environments, each tailored to a specific project, disposable and totally isoated?
Well, that is exactly what devcontainers are all about. Lets see how far we can take it …
Configuration
The big picture
Before going into details, lets have a look at the different parts we are going to cover in this article:
Part 1: The devcontainer configuration file
This file is named .devcontainer.json and is located at the root of you folder hierarchy. This file describes the different parts of your devcontainer.
Part 2: The dotfile repository
This repository holds the configuration files for the software you choose to install in your devcontainer. Two files will be particularly interesting: the .zshrc (main configuration file for zsh) and setup.sh (installation script for the dotfile repository).
What we are going to build
In this article, I will show how to build a devcontainer with the following items:
- Neovim (without the neovim configuration files)
- NodeJS (through NVM)
- Homebrew & npm
- Lazygit
- Oh-my-zsh (and some useful plugins)
- Some useful tools
- prettier
- typescript
- jless
- exa
- fzf
- bat
- ripgrep
- stow
Prerequisites
Before starting, make sure you install DevPods and configure a docker provider and the editor you intend to use (or no editor at all; there is also a configuration for that).
Once DevPods is installed, you have access to a command line tool called devpod-cli.
Execute the following command lines and adapt them if needed:
devpod-cli ide use none # set no editor
devpod-cli provider add docker # add the provider to be docker; other provider are available
Part 1: The devcontainer configuration file
As stated before, this file describes the content of the Devcontainer. This file has a json structure and follows the specification shared in the references below.
We are going to focus on some sections of the specification only: dockerfile, features, some settings and some additional options.
{
 "name": "my_dev_container",
 "version": "1.0.0",
 "build": {
   "dockerfile": "./Dockerfile"
 },
 "features": {
   "ghcr.io/devcontainers-contrib/features/neovim-homebrew:1" : {},
   "ghcr.io/devcontainers/features/node:1" : {},
   "ghcr.io/devcontainers-extra/features/npm-package:1" : {
     "package": "prettier"
   },
   "ghcr.io/devcontainers-extra/features/npm-package:1" : {
     "package": "typescript"
   },
   "ghcr.io/devcontainers-extra/features/npm-package:1" : {
     "package": "jless"
   },
   "ghcr.io/georgofenback/features/lazygit-linuxbinary:1" : {}
 },
 "settings": {
   "terminal.integrated.defaultProfile.linux" : "zsh",
   "terminal.integrated.profiles.linux" : {
     "zsh" : {
       "path": "/bin/zsh"
     }
   }
 }
}
Let’s detail the different parts of this file:
- build: this section allows you to specify a Dockerfile to build the container. Personnally, I only use it to specify the image reference. A shortcut would have been to skip the build section and directly reference the image here (see the image section in the specification for more details).
- features: this is the main section of the file. Here I specify which items I want to have pre-build into the container. It is like running
aptbut better.
In my file, I preinstall the following features: neovim, modejs through nvm, prettier, typescript and jless as npm packages and finally lazygit.
Other features are available; see the full list using the link in the references section. - settings: specific settings; here the shell to use. If you are using VSCode, this is the section where you would add editor specific settings.
At this point, you can open a terminal, cd into your directory containing the .devcontainer.json file and run the following command:
devpod-cli up .This will build the image and store it in a registery exactly like a regular Docker container. You can then query this registry using the following command:
devpod-cli lsYou can then ssh into your new devpod container and test the installation using the command line:
devpod-cli ssh .Part 2: The dotfile repository
What is a dotfile repository?
A dotfile repository is a collection of configuration files which are archived and can be used to quickly set up a new machine / environment.
Surely you had this situation where you buy a new machine and you need to spend hours transfering your new configuration in order to have all your tools and configs the way the used to be. Using a dotfiles repository can save you a lot of trouble.
Dotfiles are stored in a separate repository which only contains your configuration files.
Since in Linux everything is handled through files (especially configuration), you can version these files in a git repo of your choice in order to have them whenever you need. Setting up a new environment becomes as simple as executing a git clone command and off you go.
How are we going to use dotfiles?
You see, we are currently in the process of setting up automatically a new development environment from scratch. Surely, inside this new environment you would like to have you usual tools and configurations (keymaps, shell etc.).
Using dotfiles, we can set up this part automatically during the Devpod container creation.
The dotfile repo structure
The structure of this separate repository is rather simple. Every folder represents configurations for a particular tool: for axample inside the nvim folder I will have all configuration files of my neovim setup (these top-level folders can have any name you want).
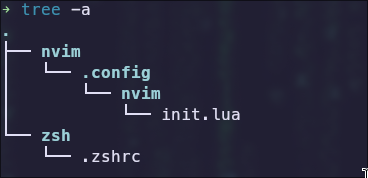
Inside these folders, you will have a directory structure that matches the one you would have if you were to copy these files manually inside your home folder. Here a simple example of a directory structure of your dotfiles for your .zshrc and your nvim configuration files:
The reason we recreate such a directory structure is because we will use a tool called GNU stow to automatically set up these file for us.
Stow creates symblic links that allow you to keep your dotfiles in one versionned directory and to have symbolic links all over your system pointing to that directory.
The dotfile repo content
Inside my dotfile repo, I can have all the configuration files I need in order to set up my development environment. That is, of course, a superset of all the configuration files for the tools that we are going to install building the devpods container. You simply set up only the symbolic links you need using stow depending on your needs.
To keep things as simple as possible, I only set up my shell and my neovim since both of these operations can be time consuming.
In addition to your configuration files, your dotfiles repo should have a configuration script located at the root of the file structure. It can have one of the following names and has to be an executable file:
- setup.sh
- bootstrap.sh
- install.sh
The dotfile setup script
Here is the setup script I use to set up a new devcontainer for software development:
#!/bin/sh

# install powerline fonts
git clone https://github.com/powerline/fonts.git
cd fonts
./install.sh
cd .. && rm -rf fonts

# install oh-my-zsh plugins
zsh -c 'git clone https://github.com/zsh-users/zsh-syntax-highlighting ${ZSH_CUSTOM:-~/.oh-my-zsh/custom}/plugins/zsh-syntax-highlighting'
zsh -c 'git clone https://github.com/zsh-users/zsh-autosuggestions ${ZSH_CUSTOM:-~/.oh-my-zsh/custom}/plugins/zsh-autosuggestions'
zsh -c 'git clone https://github.com/zdharma-continuum/fast-syntax-highlighting ${ZSH_CUSTOM:-~/.oh-my-zsh/custom}/plugins/fast-syntax-highlighting'
zsh -c 'git clone https://github.com/marlonrichert/zsh-autocomplete ${ZSH_CUSTOM:-~/.oh-my-zsh/custom}/plugins/zsh-autocomplete'
zsh -c 'git clone https://github.com/zsh-users/zsh-history-substring-search ${ZSH_CUSTOM:-~/.oh-my-zsh/custom}/plugins/zsh-history-substring-search'

# install additional software packages using apt (keep it at minimum)
sudo apt update && \
	sudo apt install exa bat ripgrep stow -y

# stow the config file from dotfiles into the container
cd ~/dotfiles
rm -rf .git

stow -t ~/ nvim

rm ~/.zshrc
cp -v zsh/.zshrc ~/.zshrc.bak
stow -t ~/ zsh

# install fzf manually (throws error when installed through binary)
git clone --depth 1 https://github.com/junegunn/fzf.git ~/.fzf
~/.fzf/install --key-bindings --completion --no-update-rc --no-bash --no-fish
echo "export FZF_HOME=~/.fzf" >> ~/.zshrc
echo "export PATH=\$FZF_HOME/bin:\$PATH" >> ~/.zshrc
echo "[ -f ~/.fzf.zsh ] && source ~/.fzf.zsh \n" >> ~/.zshrc

# switch to zsh
echo "zsh" >> ~/.bashrc
Here a quick tour of the file content:
- First we install some powerline fonts so symbols work on the command line prompt.
- Next, we install zsh plugins from their respective github repositories.
- Then, we install some more packages through
npm. I prefer to install packages through features but some are just not working/available. - Further, we replace the default zsh configuration file with ours.
- Then, we intall and set up
fzf. - Finally, we manage to execute zsh shell whenever we log in.
Telling Devpods to use our dotfiles
Fortunately, the devpod-cli command line tool has an option to use dotfiles. So at this point, you can execute the following command to have a look:
devpod-cli up . --dotfiles <git_repo_url>Once your dotfiles cloned, the build process should automatically look for the installation file and execute it. If not present, your dotfiles will only be cloned to your devcontainer (at the root).
Wrapping up
Devcontainers are an amazing way to set up your development environment, completely agnostic of the stack you are using.
It allows you to completely skip the time-consuming installation process of setting up a development environment and to quickly get going on a new stack. The only thing you need on your host machine is a framework like DevPods.
In this article we used DevPods to be editor agnostic, but you could very well chose to implement all your devcontainers using VSCode or any other IDE implementing the specification.
References
- The Devpods main page: https://devpod.sh/
- The Devcontainer specification: https://containers.dev/implementors/spec/
- A similar article: https://medium.com/@jamiekt/vscode-devcontainer-with-zsh-oh-my-zsh-and-agnoster-theme-8adf884ad9f6
- Features available to devcontainers: https://containers.dev/features
- GNU stow: https://www.gnu.org/software/stow/
- FZF: https://github.com/junegunn/fzf